House Pictures Chat Corner - Show off your house pictures!

  • Erstellt am 2015-11-25 10:27:31

kbt09

2022-08-28 20:12:25
  • #1
... lassemann has its own thread in which several photos have already been posted. The photos start .
 

Holzhäuschen

2022-09-07 14:16:24
  • #2
Us again.
We were at the house for two weeks now and barely managed to do what we wanted. My frustration is very high right now and I am really exhausted and have zero motivation at the moment. It will definitely change again, but this is the situation right now.
We had three things we wanted to accomplish.
a) Insulate the three walls in the kitchen and panel them with wood so that the electricians can install sockets there. Then the construction power could be switched off and power would come directly into the house.
b) Fully insulate and panel the guest WC, build the pre-wall, panel it, and tile it. Also, in Q2 or Q3, putty so that we can then paint or wallpaper the walls. Then the plumbers can install the toilet and the sink and we will get rid of the porta-potty.
c) Insulate the main bathroom upstairs, fully panel it, install two pre-walls, and put the first wood for the connection above the tiles (we tile everything except the shower up to 120 cm, above that come half boards). This has to be finished by 01.10 so that the tiler (WE ARE DOING SOMETHING NOT OURSELVES, YAY) can start.

What we managed from a) were only two walls, because the electrician forgot one socket and only came after 1.5 weeks to lay the cable for it. b) we lack the tile cutter and noticed that we took FOREVER for the tiny little bathroom and time for the upstairs bathroom became tight, so no Q putty nor tiles yet. c) see b.

So.
Task a) was complicated again, the water connection for the sink was so badly placed that the socket for the dishwasher didn’t fit in the right spot, made dozens of calls until we found a solution. Attaching the wood in such a way that the reveals still fit afterward (couldn’t do it before because we were progressing with the wood and didn’t know where it would end up and the reveal might have protruded too far), sparing the window, attaching the wood at the top without visible screws... oh dear oh dear oh dear
At the beginning

Insulated and started with the window wall


Window wall finished


Then the interior wall afterward

And everything done


Later we noticed what it means that the wood moves. We were very careful everywhere that the gaps between the planks were extremely small. But because the humidity was very high, the wood later shrank and now screws are visible everywhere again.... So later we brought wood into the house so that it acclimatizes for the other walls.
 

Holzhäuschen

2022-09-07 14:27:54
  • #3
Project B was next, the annoying guest WC. At first, actually all four walls were supposed to get wallpaper. But since we only have tiles on the stud wall, we didn’t want a very expensive wallpaper behind the sink that might quickly look bad. So we decided to paint that area with clay paint, on the wall with the sink and the toilet.

Our starting point: walls not yet fully clad, so overall 1 - 2 layers of cladding are still missing, insulation partially as well.[ATTACH alt="IMG_20220828_171059.jpg" type="full"]74631[/ATTACH]
[ATTACH alt="IMG_20220828_171105.jpg" type="full"]74630[/ATTACH]
[ATTACH alt="IMG_20220828_171109.jpg" type="full"]74629[/ATTACH]

So first we had to build a stud wall (we still have plenty of wood). Sepp then had the cool idea to install a niche shelf, which of course also took a lot of time. Cutting the parts for the toilet out of the gypsum wall was also really fun (not).
[ATTACH alt="IMG_20220901_193612.jpg" type="full"]74627[/ATTACH]
Here you can see the two niche shelves, the second panel on top is still missing.
[ATTACH alt="IMG_20220901_140006.jpg" type="full"]74628[/ATTACH]

For now, this is the final status, the upper niche shelf is not cut out yet, we are considering leaving a curve there, so no straight cut at the top.

[ATTACH alt="IMG_20220906_111508.jpg" type="full"]74626[/ATTACH]

Regarding the color scheme:
These are our tiles, there will be the Oceania wallpaper from The Gap on 2 - 3 walls.
We will also paint in a shade of green, probably Fern from Volvox.
The tile edge trim will be gold.
[ATTACH alt="IMG_20220831_163132.jpg" type="full"]74632[/ATTACH]
The wallpaper
[ATTACH alt="WP20304.jpg" type="full"]74633[/ATTACH]
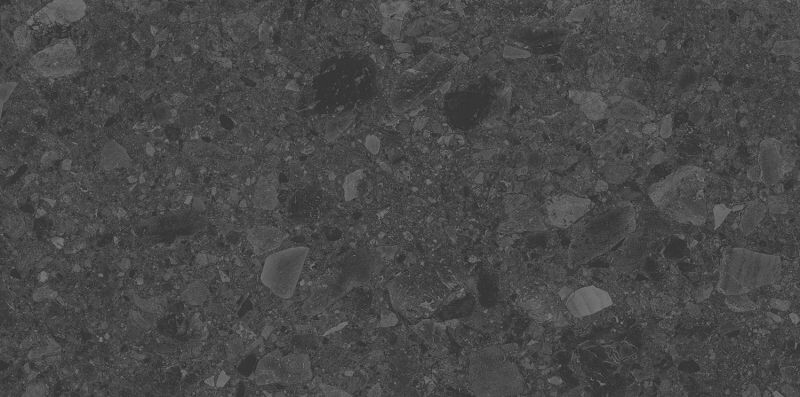
The floor tiles will be Terrazzo Night.


So what’s still missing now are Q1 / Q2, perhaps Q3 for the wallpaper, the tiles and the paint, for installation.
Oh, and at the top the pipes still need to be clad with formwork boards...
 

TmMike_2

2022-09-07 14:29:08
  • #4
don't be discouraged, interior finishing always eats up the hours in the end. looks top!
 

Holzhäuschen

2022-09-07 14:45:39
  • #5
Project c) is the bathroom upstairs. We had help on Sunday and managed to get quite a bit done. But first, we had to fix oversights / measurements from our plumbers and build some more wood into the cavities so that everything can be properly attached later. So many things to think about...

Then continue with the cladding, build the partition wall for the toilet. With the bathtub, we couldn’t figure out how high the support beam is and how high we need to build the partition wall there. So we had to wait until we could talk to the plumber again. He then just sent us the materials right away. He said he sometimes has three different size specifications from the manufacturers and the safest thing is to measure it yourself on the actual object. Okay.

Starting situation
Shower

Shower and sink

Bathtub area

and toilet


Interim stages
Toilet

Shower


Sink and shower area

Final state
Bathtub support placed for the feeling of space, for me with my previous tiny bathroom super spacious ;D

Shower and sink, finished cladding, partly spackled Q1.

Toilet also finished for now.


I HATE drywall and can’t wait to finally continue with wood. Apparently, we have to finish the bathroom by the beginning of October. So I hope we can manage that over the next two weekends.

After that, we can raise the third wall in the kitchen and also the living room wall so the electrician can drill sockets.
 

Holzhäuschen

2022-09-07 14:47:21
  • #6
Thank you very much, we are absolute amateurs and have taught ourselves everything. It's good to hear. I just never want to stuff hemp (in any form) anywhere again and never touch drywall panels again xD but that will take a little longer. Can't wait to continue raising the wooden walls. That's actually fun.
 

Similar topics
25.10.2013Need help with bathroom planning19
21.10.2017Experiences with rimless toilets104
28.09.2015Poor layout of a 4.5 sqm ground floor bathroom with shower14
05.07.2016Bathroom planning for a small bathroom with a walk-in shower22
22.07.2016Main bathroom (10 sqm) with open shower, any ideas?84
02.02.20178.02m positioning sink / toilet69
30.09.2017Fitting a larger shower in the floor plan - Which size to choose?38
27.10.2017Sink in the laundry room?18
02.02.2018Bathroom planning - How to utilize space for washbasins and cabinets32
04.05.2018No hot water is coming in the shower anymore...13
29.12.2018Renovation tips for a very small bathroom with a shower instead of a bathtub36
28.11.2020Layout Planning: Bathroom Shower47
01.02.2021Bathroom planning - Swap shower and bathtub?24
12.06.2021Install laundry chute in shower?96
29.10.2021Bathroom planning - Is the splash guard wall of the walk-in shower long enough?14
26.12.2021Bathroom layout possible like this - distance from toilet to drainpipe12
05.01.2023Bathroom layout 8.7 sqm, with shower and bathtub16
04.01.2024Toilet too close to the wall, what now?31
23.02.2024Retrofit bathtub or shower?27
08.05.2025Is a small walk-in shower possible?11

Oben