Room Divider Living Area Experiences

  • Erstellt am 2024-10-22 09:08:47

Prager91

2024-10-22 09:08:47
  • #1
Hello everyone,

I am currently planning a redesign in our living room and would like to separate the living area from the dining area (or play area for our daughter).

We prefer an open version (à la panels) but ideally combined with storage space for the toys.

We were thinking of something like this:


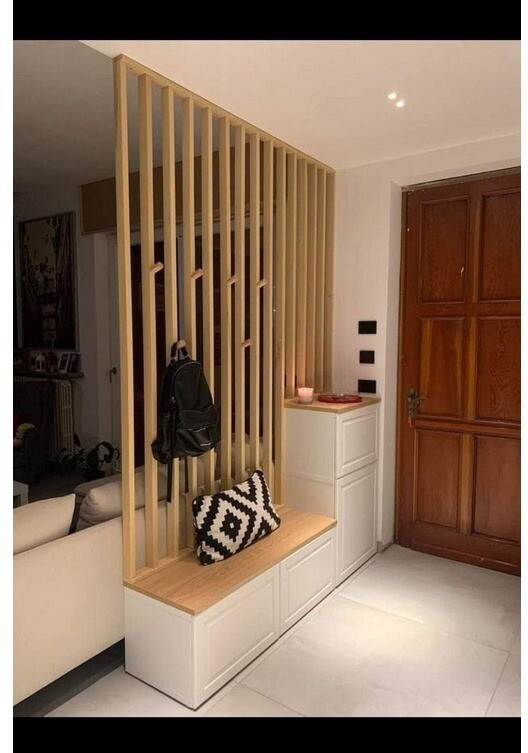
Craftsmanship skills: I acquired a lot during the house construction two years ago and am open to everything - I like to try new things.

However, the project should not require too much craftsmanship and should definitely be doable for a hobby craftsman.

Does anyone have experience with room dividers à la panels? Which systems are reasonable and feasible here - preferably combined with a suitable shelf for storage?

The panels from the nearby hardware store come with suitable brackets for gluing to the ceiling and floor - I don’t know what to make of that... Since we have underfloor heating, gluing to the floor makes sense - but I would prefer if the panels are screwed directly to the shelf.

Also, I find the brackets on the floor and ceiling quite unattractive visually.

Of course, the whole thing should be as inexpensive as possible - we need about 1.20m in width.

I would appreciate any input that supports such a DIY project.

What interests me most, of course, is the mounting on shelves or possibly also on the floor and ceiling.
 

Arauki11

2024-10-22 09:19:08
  • #2
This is apparently directly in the entrance/living area and should therefore look nice, I think. In this respect, I would refrain from a DIY approach. The art is to be as open as possible and as closed as possible, in other words, the all-rounder that one is always looking for. I would get a roughly half-height "sideboard" or even better, for example, a system from "Haller" (or something similar), as you can use these on both sides arbitrarily and also build/change them in many ways. The ones from Haller are not exactly cheap even used, but actually an investment; I would also look for something used of high standard anyway, there are often interesting pieces. Ikea, in my opinion, also often has stylish designs and there are many hacks on the web for these. Then you would have an Ikea part as a basis and could adjust it DIY... e.g. Kallax; tensioned to the ceiling there is e.g. elvarli or similar.
 

Prager91

2024-10-22 09:26:24
  • #3


Actually, the room divider is supposed to be directly adjacent to one side of a sofa -- transition into the play area / dining area. It therefore stands on the exterior wall facing the terrace and then extends into the room.

Yes, it definitely should look very fancy – I absolutely don’t want it to look cheap.

We notice that such an "open" room divider would do us well visually – hence also the option of panels in combination with shelves/storage space.

I think it's more likely to go for an IKEA DIY than something like Haller (that is just way too expensive for us). If, for example, you cover a Kallax shelf with a nice wooden top and then attach panels on it, it already looks quite modern and fancy (hence my picture as a reference for my planning).

Elvarli is a good idea – but what you get for the price is really extremely expensive. Since a 1.20m shelf like Kallax would be enough for our storage needs, we would probably get the most cost-effective and best result with that – but maybe there are other ideas? I’m just still unsure how the panels should be attached in combination with a shelf.

Unfortunately, I can’t find any suitable "instructions" on how such a project can be implemented.
 

Arauki11

2024-10-22 09:40:04
  • #4
I am not clear on what exactly you mean by panels and what they are supposed to achieve. Maybe you have a picture of exactly such panels in mind.
 

nordanney

2024-10-22 09:40:39
  • #5
Why don't you just make it easier for yourself? The base cabinets can be, for example, Ikea Metod. On top of that, oak panels - available at any hardware store (preferably at OBI, they gladly cut everything precisely to the millimeter). Naturally, sand and chamfer the wood nicely. Apply Rustins Danish Oil. Prepare the slatted construction separately. Then you can invisibly screw the struts from above and below onto the horizontal wooden pieces. Glue onto the wood on the cabinets and drill three times into the ceiling.
 

Prager91

2024-10-22 09:47:49
  • #6


The wooden panels according to my picture (from shelf to ceiling).
 

Similar topics
13.10.2017IKEA kitchen quality and experiences?140
21.03.2013IKEA LAGAN DW60 - Water Supply Hose Extension13
09.01.2012Loss of a long-term IKEA customer24
09.12.2011From when must one know as much as an Ikea employee?14
04.02.2012Complaint Ikea Storm Floor Lamp13
06.09.2013IKEA does not need my money12
25.10.2011Designations Ikea furniture names16
30.05.2011How do you find Anna from the Ikea Support Center?14
17.02.2009Offers at Ikea for dishes, bowls, and small bowls16
26.03.2009IKEA Kurios21
14.09.2012Rumor: Will the Ikea Faktum kitchen be replaced next year?32
05.04.2014Broder shelving system no longer available in IKEA's assortment?18
07.11.2014Is a new Ikea kitchen system coming?31
15.01.2017Ikea Metod 20 drawers are nicer than the wire drawers67
10.08.2015Ikea FAKTUM wall cabinet vitrine/horizontal: hinges wanted10
19.04.2016Equip Ikea Kallax with shelves12
04.05.2016Ikea Kallax - maximum load capacity13
21.11.2017Ikea stroll and shopping - This time more frustration than pleasure122
06.08.2018Survey Ikea furniture in the new house - cabinet furniture, upholstery, etc.35
11.05.2022IKEA Elvarli wardrobes for walk-in closet?16

Oben