Poolerbauer
2021-05-12 13:01:38
- #1
What does a DIY Styrofoam pool really cost (in Austria)?
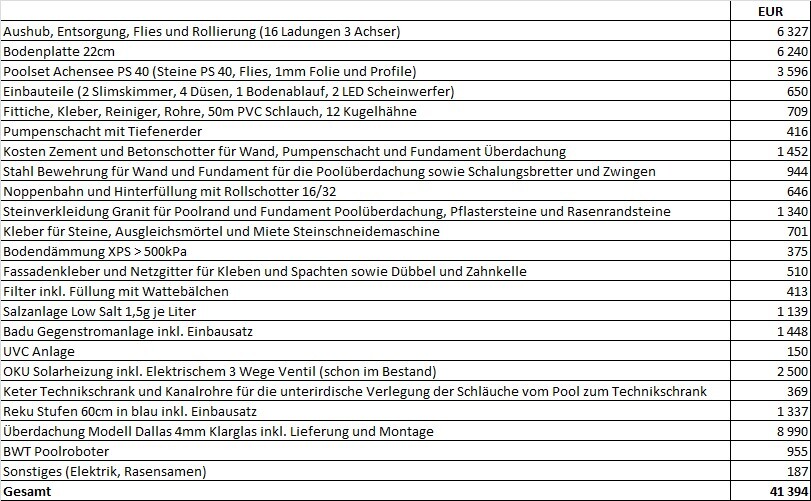
In this post, I want to provide you with information about the work and costs involved for a DIY builder of a Styrofoam pool. The pool set itself makes up only a small part of the costs. Right away: Our project incurred costs of EUR 41,100 and almost 44 man-days of self-management. We have broken down the individual tasks below. This way, everyone can get an idea of which costs and workload come with which equipment. Details see below! I would also like to point out that these are our individual experiences based on the described pool design. If someone has different experiences, they can share them, but I will not discuss them.
Why did we actually choose a Styrofoam pool?
It was important for us that the pool is insulated on all sides since we wanted to heat it and swim comfortably until early October or even longer if possible. Since most heat escapes upward, a cover was also planned. More on that later.
The following alternatives were also possible: polyethylene pool, masonry (concrete block) or concrete pool, fiberglass pool.
At first, the polyethylene pool appealed to us because of the relatively simple installation. Excavation, making a base slab without side reinforcement, crane delivery (already pre-installed), and closing the side excavations with lean concrete. Right away: This is certainly the least labor-intensive overall option. But: The durability of these pools is stated as 20 years. That passes quickly, and what then? If the basin has to be replaced, all the lean concrete would have to be broken up again, which means another big construction site—apart from the additional costs. Styrofoam is certainly durable beyond 40 years provided it is not exposed to UV light. Since it is used under the floor slabs of passive houses, theoretically it should last beyond 100 years. However, experience is lacking here. At the neighbor’s house, the 5 cm facade is now 40 years old and in top condition.
An acquaintance owns an older fiberglass pool. It has become unsightly over time and needs repairs at several spots each year. Insulation is also difficult. But it's definitely the cheapest option.
A fully concreted pool was out of the question for a DIY builder. The concrete block pool was also not an option for us due to the high weight. Additionally, placing the concrete blocks requires some masonry experience to ensure the walls are truly straight and at the right angle.
So we chose the Styrofoam pool because of its light weight and insulation. In the planning, we set the following:
.) Size 8 x 4 m (just enough for swimming; you can cool off cheaper under the garden shower)
.) If possible, flush with the floor, no raised edge
.) Insulation also on the floor
.) As high a water level as possible, i.e., slim skimmer
.) Excavation and floor slab construction subcontracted, the rest done by ourselves
.) No technical shaft because we don't want to crawl down anywhere on all fours. Filter pump and counter-current system in a small low pump shaft 80 cm below the water surface, the rest in a separate technical cabinet a few meters away at the house
.) Steps, no ladder
.) Pool cover
.) UVC clarifier and salt system
.) Counter-current system (more for fun, in our opinion not really necessary for this pool size)
The excavation
An area of about 9.3 x 5.3 meters was excavated (somewhat wider on the pipe laying side than on the opposite side). The planned depth was 200cm (20cm rolling layer, 22cm floor slab, 155cm pool height (150cm height + 5cm insulation, without edge slabs). Goal: Edge slabs (granite) were to protrude over the surroundings (about 4 cm with adhesive). Since direct truck access was not possible, a dumper was also used. A total of 16 loads of earth from a 3-axle truck were removed. Costs for excavation including laying the rolling layer (9m3 crushed stone): EUR 6,247. Of this, the excavator and dumper work amounted to only EUR 1,700, EUR 670 for the rolling layer. The large part is due to the removal and disposal of the earth. So anyone who can reuse the soil themselves (e.g., raising their property) can save a lot. Between gravel and soil, nonwoven fabric was laid. On the internet, 150g fabric is available for EUR 80.
The floor slab
The floor slab is 22cm thick, measurements 8.70 x 4.70 (additional overhang of the pool size as support for the piping). The reinforcement was done according to my specifications. There are plenty of construction plans on the internet. We did not skimp on the reinforcement. A maximum variant was used here. AQ 65 steel mats, every 25cm two vertical bars for the walls, as edge reinforcement all around two 12mm steel bars. Just like a floor slab should be made. The standing side reinforcement must fit exactly in the middle of the openings of the Styrofoam stones. Cost of the floor slab EUR 6,240. Concrete quality C25/30 B3 GK 16 fine smoothed. It pays off, as with other construction projects, to get as many offers as possible and to specify the specifications (concrete quality and exact reinforcement plan). The most expensive offer here was almost EUR 12,000 for the same performance. Also, keep an eye on whether the reinforcement is executed according to plan.
I installed the floor drain myself after the workers had finished the reinforcement. I fixed it with concrete and routed the pipe through the edge formwork. Since we also wanted to install 5cm floor insulation, the drain is approximately 4cm elevated. Not easy to route through the two steel mats. Therefore, suitable adhesive clips should be available to adjust the pipe alignment.
In the previous works, apart from installing the drain, not much has happened on-site.
The pool set
We chose an Achensee basic set with PS40 stones. The advantage of this set is that the foil is not 0.8 but 1mm thick. The set includes the stones, nonwoven fabric, 1mm foil, and profiles for hanging the foil. Costs including delivery: EUR 3,596 incl. shipping. Purchased online. Delivery time 8 weeks. A complete set including ladder and piping was not an option for us since both the piping and the technology are individual and we also wanted slim skimmers, which are not included in standard sets. We also didn’t need a ladder. Whether it really has to be PS40 stones – for that, experience is lacking. We have had good experiences with these.
Piping and components
2 Astral slim skimmers total EUR 300, 4 Astral inlet nozzles including fitting EUR 118, 1 Astral floor drain EUR 27, all piping, glue, cleaner, 50m hose, countless fittings (elbows, T-pieces, connectors), and numerous ball valves EUR 709. Since we separated the technical cabinet from the pump, a little more was incurred here. Skimmer and floor drain can be individually shut off or throttled via ball valves. Even in a pool set with piping, much would have been missing here and we would have incurred an additional EUR 300. Total for piping and nozzles thus EUR 1,127. Again, comparing prices pays off. For example, there is a mail-order water technology dealer in Germany where ball valves and PVC fittings cost considerably less than in pool shops.
Furthermore, we purchased 2 Astral mini floodlights. I replaced the 50-watt halogen bulbs with 5-watt LEDs. Much cheaper than buying LED floodlights as a complete package. Both floodlights with exchanged LED bulbs EUR 205. I still had a 12V power supply leftover from a disposed device. The two floodlights sufficiently illuminate the pool.
The pump shaft
For filter pump and pump of the counter-current system. Size 80 x 90 cm, depth 80cm, floor 20cm concrete, walls 15cm concrete, self-formed and concreted with formwork, with drain, pumps stand slightly raised inside the shaft in case water leaks. Directly adjacent to the pool. Covered with a shaft cover 80 x 80 cm. The shaft cover is filled with lightweight concrete (cement-styrofoam mixture) so it is not too heavy. The top layer consists of a pebble carpet. Under the pumps is a rubber mat for noise reduction (washing machine mat). Total incl. 2 ventilation openings EUR 296. The costs for concrete, formwork, and reinforcement are not included. Several hours of work went into the formwork, reinforcement, and concreting. Additionally, a 3m stainless steel grounding rod cost EUR 120 (for the counter-current pump, which requires separate grounding) and was embedded in the shaft floor. This is affordable on eBay.
The technology
The filter is a single-container filter with a 75l vessel. Due to the weight, it is filled not with sand but with batting balls. Cost for both: EUR 413. We chose a Low Salt system (1.5 grams per liter) as a salt system. Cost EUR 1,139. The UVC unit was already available. Cost around EUR 150. For the Badu counter-current system including installation kit, EUR 1,448 were incurred. An OKU solar heater with 12 modules was already from the previous pool. Cost with the electric 3-way valve approx. EUR 2,500. We have had good experiences with this heater. It achieved up to 7 degrees + per day with 30,000l. It is a primary system and operated by the filter system. If the temperature on the roof is higher by x degrees than in the pool, the filter flow is routed over the roof and the water returns warmed. For a Keter cabinet housing the technology, EUR 269 were incurred. We ran the hoses and cables between the pump shaft and the technical cabinet in conduit pipes (EUR 100). Total technology cost EUR 6,019. Of course, some savings can be made here (heater, salt system, counter-current system). Since the kids often spend one hour in the pool, a chlorine-free and well-tempered pool has a positive effect here.
The steps
We decided to procure the (fiberglass) steps separately. This allows the pool foil to be replaced cheaply and quickly (it is a standard 8 x 4 x 1.50 foil). The step holder is concreted into the wall. Reku steps (60cm wide) are simply screwed onto the wall. Cost incl. wall mounting EUR 1,337. They also come in 80cm width but take up more swimming space. A Roman step would have been nice too. Unfortunately, we lacked space for that. The pool length with surroundings and rail extension for the cover is already 11.4 m. Also, making a Roman stair would be much more laborious.
The pool is built
The Achensee pool stones fit precisely, and the assembly goes relatively quickly. In principle. Because usually, the floor slab is not perfectly level. Therefore, special care must be taken for the first row of stones. I partly underpinned the stones with façade adhesive so that the first row is truly level. The main work, however, is not putting the stones together but making the reinforcement. The reinforcement protruding from the floor slab was extended vertically up to the pool height of 150cm. In addition, a double horizontal reinforcement (2x 10mm iron) was laid around for each of the 5 Styrofoam stone rows. Costs for the pool wall reinforcement amounted to EUR 539 (630m steel). The vertical rods were wired to the horizontal reinforcement. Three hours of work per row. The delivered 7m rods (630m) had to be cut and bent as well. About 4 hours of work.
At first, the stones were supposed to be filled by machine. The construction company that made the floor slab advised against this. So it was done manually. First the first three rows, then the remaining two including a 5cm concrete ring. A total of 6m3 of concrete in 2 stages. Duration more than 2 days with up to 3 people. With machine filling all 5 rows simultaneously, I find it hard to imagine the concrete flowing everywhere. The stones are staggered by half and have webs in between. There is also the horizontal reinforcement that further hinders concrete flow. We already had to assist the flow in some places in the 3 rows with rods (without compacting!!). Concrete and gravel costs EUR 1,452 (very good mix 1:3.5). This includes concrete for the pump shaft and a 40cm wide, 11.5m long, and 22cm thick foundation for the pool cover. A mixing machine was provided to me free of charge by a neighbor. Filling the lower stone rows manually is surely one of the most strenuous works in pool construction. The concrete must be poured into buckets and hoisted down. The upper rows can be filled directly from a wheelbarrow – that is faster and easier. For the lower rows, 3 people are needed: one mixes and supplies, two fill. In addition to concrete costs, there were costs for the wooden formwork for the ring and the necessary clamps (EUR 166). Overall, concreting the walls with reinforcement cost EUR 2,160. For the foundation strip left and right (each 40cm wide for the pool cover), additional costs for steel and form boards of EUR 239 occurred. Preparing this side foundation took 2 days (setting up formwork, bending and cutting steel, weaving reinforcement). The concreting itself took about 8 hours (2 people).
After setting the first row, piping to the opposite inlet nozzles was glued and laid on one long side. Since two pipes had to be laid side by side in part, the floor slab was widened at this short point with form stones as a base so the pipes rest on it. The pipes were fixed to the floor slab with holders and covered with lightweight concrete (styrofoam-cement mixture) so that they are somewhat insulated and protected from uneven pressure (stones) (costs EUR 81). I wouldn’t pour backfill (rolled gravel) directly on the pipes.
The backfilling
A dimple mat (EUR 106) was laid around the pool. Backfilled by hand with rolled gravel (13.5m3). Cost EUR 540. Work for 2 people 2 days.
The edge stones
For the surround, granite edging was ordered via eBay (cost EUR 800). For the foundations of the pool cover, matching granite slabs (40x60) were bought from the hardware store (EUR 460). EUR 75 for lawn edging stones, which form the boundary to the neighboring plot, which is somewhat higher after the foundation. Then paving stones for the pump shaft surround to separate it from the lawn (EUR 4.79). I also installed 5 LED paving stones (EUR 77) in between. Natural stone adhesive or special flexible adhesive and flexible joint compount EUR 234. Rental cost for a stone cutting machine EUR 64. It can also be done with an angle grinder. Then the cuts are not as precise and there can be chipping in the stone. And huge dust clouds.
A detail rarely mentioned is the level adjustment between the concrete ring and the hanging profiles for the pool foil before gluing the stones. The hanging profiles are mounted on the concrete ring with nail anchors. I partly underpinned them with façade adhesive because the raw concrete is not perfectly level. Level differences can also be compensated here. Mounting with nail anchors then goes relatively quickly. But now here comes the catch. There is now a level difference of about 1cm between the mounted profile and the concrete ring. This must be levelled with leveling mortar. Also on the 40cm wide strip for the pool cover foundation so that the stones are all on one level. That requires a lot of material. Costs for Cimsec leveling mortar EUR 403. Work for one person 2 days. You could partly save that if additional side foundations were concreted 1cm higher from the start. But you have to think of that first!
For cutting and gluing the stones, at least one day should be planned (first laying out, then cutting, checking, and finally gluing). The time for grouting the stones should not be underestimated either, as this must be done very cleanly and immediately cleaned (another 8 hours). Once the joint compound has dried on the rough stones, the stains are not easily removed. If only the pool edge is grouted (without additional side stones), it goes faster as some joints are omitted.
Total costs for the stone edging including support for the pool cover EUR 2,150.
The floor insulation and the plastering
For floor insulation, we did not use the insulation boards offered by pool shops because they are far too expensive. Instead, XPS tongue-and-groove boards with a compressive strength of >500 kPa. These are more pressure-resistant and cheaper. Costs EUR 375. Important: The tongue-and-groove boards (smooth) must be roughened before gluing with a wire brush because façade adhesive does not stick to the smooth surface and the boards loosen after drying. Since both edges and floor were plastered (floor also glued), additional costs for adhesive of EUR 402 occur. I definitely recommend plastering the walls because only then is a really smooth surface created. Even with PS40 stones (which are very stable and precise and hardly yield to the concrete), the transitions show. Additional costs for a 50cm stainless steel notched trowel EUR 14. For the mesh grid EUR 44. Work for gluing and doweling the floor insulation at least 1 day. That is the more intensive work because unevenness of the floor slab has to be compensated with adhesive. Additionally, I doweled (facade anchors EUR 50). Goes relatively quickly (2 hours) and provides additional security against lifting of the boards in case of leakage undermining. Plastering 2 days for one person. Floor insulation and plastering total EUR 885.
The cover
Here we chose the Dallas model with 4mm clear glass including rail extension. Cost EUR 8,990 including delivery and installation. That alone could buy a small car. It is also available as a kit completely dismantled for EUR 7,099. Then the panes have to be installed and rubber seals cut. Please note that the individual elements weigh over 150kg. Total cover thus over 600kg. Although I am handy, after watching the video about assembling the parts, it was clear the cover should be delivered finished. A middle option is to have the finished elements delivered curbside. But then the price difference to a completed cover is not very high. Also, with self-management due to the weight at least 4 people are needed. The rail extension was very important to us so that the cover can be completely pushed back and does not protrude over the pool. Therefore, the side foundations are already 2.5 meters longer than the pool’s outer sides. The company’s installation took only 3 hours.
What other costs occur?
For other electrical work (main switch, fuses for counter-current system and salt system, grounding wires and cables) as well as grass seed, there was an additional EUR 187. Water filling about EUR 70.
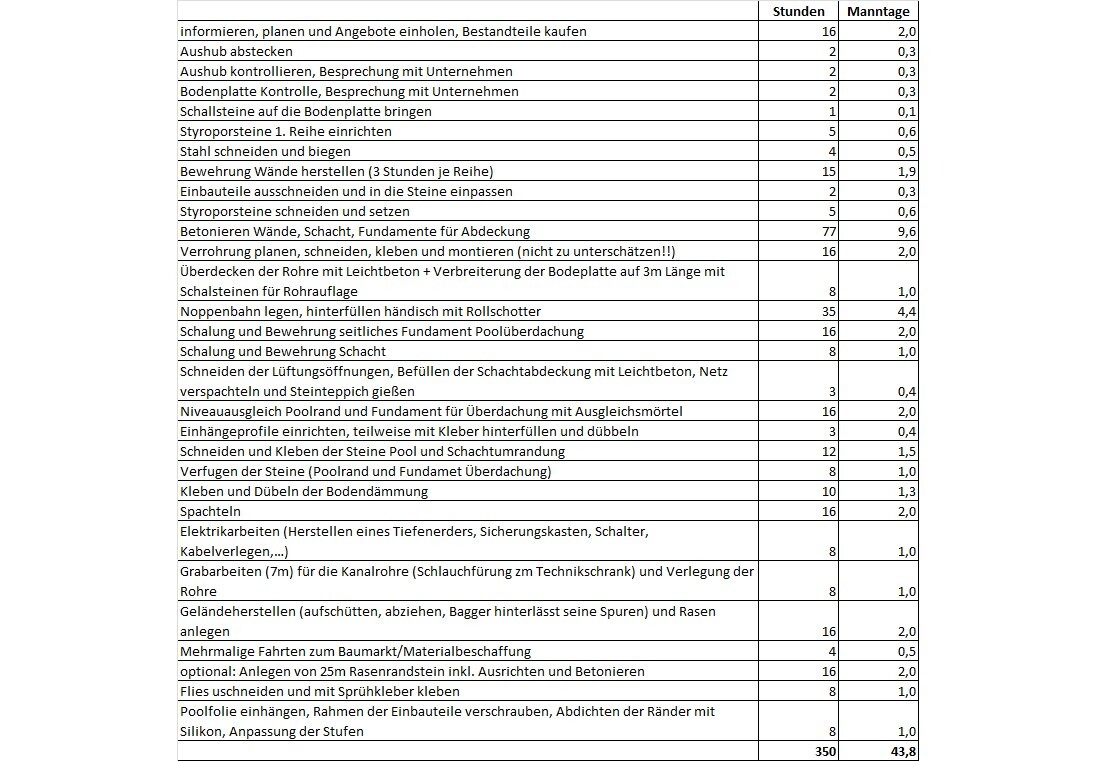
In this post, I want to provide you with information about the work and costs involved for a DIY builder of a Styrofoam pool. The pool set itself makes up only a small part of the costs. Right away: Our project incurred costs of EUR 41,100 and almost 44 man-days of self-management. We have broken down the individual tasks below. This way, everyone can get an idea of which costs and workload come with which equipment. Details see below! I would also like to point out that these are our individual experiences based on the described pool design. If someone has different experiences, they can share them, but I will not discuss them.
Why did we actually choose a Styrofoam pool?
It was important for us that the pool is insulated on all sides since we wanted to heat it and swim comfortably until early October or even longer if possible. Since most heat escapes upward, a cover was also planned. More on that later.
The following alternatives were also possible: polyethylene pool, masonry (concrete block) or concrete pool, fiberglass pool.
At first, the polyethylene pool appealed to us because of the relatively simple installation. Excavation, making a base slab without side reinforcement, crane delivery (already pre-installed), and closing the side excavations with lean concrete. Right away: This is certainly the least labor-intensive overall option. But: The durability of these pools is stated as 20 years. That passes quickly, and what then? If the basin has to be replaced, all the lean concrete would have to be broken up again, which means another big construction site—apart from the additional costs. Styrofoam is certainly durable beyond 40 years provided it is not exposed to UV light. Since it is used under the floor slabs of passive houses, theoretically it should last beyond 100 years. However, experience is lacking here. At the neighbor’s house, the 5 cm facade is now 40 years old and in top condition.
An acquaintance owns an older fiberglass pool. It has become unsightly over time and needs repairs at several spots each year. Insulation is also difficult. But it's definitely the cheapest option.
A fully concreted pool was out of the question for a DIY builder. The concrete block pool was also not an option for us due to the high weight. Additionally, placing the concrete blocks requires some masonry experience to ensure the walls are truly straight and at the right angle.
So we chose the Styrofoam pool because of its light weight and insulation. In the planning, we set the following:
.) Size 8 x 4 m (just enough for swimming; you can cool off cheaper under the garden shower)
.) If possible, flush with the floor, no raised edge
.) Insulation also on the floor
.) As high a water level as possible, i.e., slim skimmer
.) Excavation and floor slab construction subcontracted, the rest done by ourselves
.) No technical shaft because we don't want to crawl down anywhere on all fours. Filter pump and counter-current system in a small low pump shaft 80 cm below the water surface, the rest in a separate technical cabinet a few meters away at the house
.) Steps, no ladder
.) Pool cover
.) UVC clarifier and salt system
.) Counter-current system (more for fun, in our opinion not really necessary for this pool size)
The excavation
An area of about 9.3 x 5.3 meters was excavated (somewhat wider on the pipe laying side than on the opposite side). The planned depth was 200cm (20cm rolling layer, 22cm floor slab, 155cm pool height (150cm height + 5cm insulation, without edge slabs). Goal: Edge slabs (granite) were to protrude over the surroundings (about 4 cm with adhesive). Since direct truck access was not possible, a dumper was also used. A total of 16 loads of earth from a 3-axle truck were removed. Costs for excavation including laying the rolling layer (9m3 crushed stone): EUR 6,247. Of this, the excavator and dumper work amounted to only EUR 1,700, EUR 670 for the rolling layer. The large part is due to the removal and disposal of the earth. So anyone who can reuse the soil themselves (e.g., raising their property) can save a lot. Between gravel and soil, nonwoven fabric was laid. On the internet, 150g fabric is available for EUR 80.
The floor slab
The floor slab is 22cm thick, measurements 8.70 x 4.70 (additional overhang of the pool size as support for the piping). The reinforcement was done according to my specifications. There are plenty of construction plans on the internet. We did not skimp on the reinforcement. A maximum variant was used here. AQ 65 steel mats, every 25cm two vertical bars for the walls, as edge reinforcement all around two 12mm steel bars. Just like a floor slab should be made. The standing side reinforcement must fit exactly in the middle of the openings of the Styrofoam stones. Cost of the floor slab EUR 6,240. Concrete quality C25/30 B3 GK 16 fine smoothed. It pays off, as with other construction projects, to get as many offers as possible and to specify the specifications (concrete quality and exact reinforcement plan). The most expensive offer here was almost EUR 12,000 for the same performance. Also, keep an eye on whether the reinforcement is executed according to plan.
I installed the floor drain myself after the workers had finished the reinforcement. I fixed it with concrete and routed the pipe through the edge formwork. Since we also wanted to install 5cm floor insulation, the drain is approximately 4cm elevated. Not easy to route through the two steel mats. Therefore, suitable adhesive clips should be available to adjust the pipe alignment.
In the previous works, apart from installing the drain, not much has happened on-site.
The pool set
We chose an Achensee basic set with PS40 stones. The advantage of this set is that the foil is not 0.8 but 1mm thick. The set includes the stones, nonwoven fabric, 1mm foil, and profiles for hanging the foil. Costs including delivery: EUR 3,596 incl. shipping. Purchased online. Delivery time 8 weeks. A complete set including ladder and piping was not an option for us since both the piping and the technology are individual and we also wanted slim skimmers, which are not included in standard sets. We also didn’t need a ladder. Whether it really has to be PS40 stones – for that, experience is lacking. We have had good experiences with these.
Piping and components
2 Astral slim skimmers total EUR 300, 4 Astral inlet nozzles including fitting EUR 118, 1 Astral floor drain EUR 27, all piping, glue, cleaner, 50m hose, countless fittings (elbows, T-pieces, connectors), and numerous ball valves EUR 709. Since we separated the technical cabinet from the pump, a little more was incurred here. Skimmer and floor drain can be individually shut off or throttled via ball valves. Even in a pool set with piping, much would have been missing here and we would have incurred an additional EUR 300. Total for piping and nozzles thus EUR 1,127. Again, comparing prices pays off. For example, there is a mail-order water technology dealer in Germany where ball valves and PVC fittings cost considerably less than in pool shops.
Furthermore, we purchased 2 Astral mini floodlights. I replaced the 50-watt halogen bulbs with 5-watt LEDs. Much cheaper than buying LED floodlights as a complete package. Both floodlights with exchanged LED bulbs EUR 205. I still had a 12V power supply leftover from a disposed device. The two floodlights sufficiently illuminate the pool.
The pump shaft
For filter pump and pump of the counter-current system. Size 80 x 90 cm, depth 80cm, floor 20cm concrete, walls 15cm concrete, self-formed and concreted with formwork, with drain, pumps stand slightly raised inside the shaft in case water leaks. Directly adjacent to the pool. Covered with a shaft cover 80 x 80 cm. The shaft cover is filled with lightweight concrete (cement-styrofoam mixture) so it is not too heavy. The top layer consists of a pebble carpet. Under the pumps is a rubber mat for noise reduction (washing machine mat). Total incl. 2 ventilation openings EUR 296. The costs for concrete, formwork, and reinforcement are not included. Several hours of work went into the formwork, reinforcement, and concreting. Additionally, a 3m stainless steel grounding rod cost EUR 120 (for the counter-current pump, which requires separate grounding) and was embedded in the shaft floor. This is affordable on eBay.
The technology
The filter is a single-container filter with a 75l vessel. Due to the weight, it is filled not with sand but with batting balls. Cost for both: EUR 413. We chose a Low Salt system (1.5 grams per liter) as a salt system. Cost EUR 1,139. The UVC unit was already available. Cost around EUR 150. For the Badu counter-current system including installation kit, EUR 1,448 were incurred. An OKU solar heater with 12 modules was already from the previous pool. Cost with the electric 3-way valve approx. EUR 2,500. We have had good experiences with this heater. It achieved up to 7 degrees + per day with 30,000l. It is a primary system and operated by the filter system. If the temperature on the roof is higher by x degrees than in the pool, the filter flow is routed over the roof and the water returns warmed. For a Keter cabinet housing the technology, EUR 269 were incurred. We ran the hoses and cables between the pump shaft and the technical cabinet in conduit pipes (EUR 100). Total technology cost EUR 6,019. Of course, some savings can be made here (heater, salt system, counter-current system). Since the kids often spend one hour in the pool, a chlorine-free and well-tempered pool has a positive effect here.
The steps
We decided to procure the (fiberglass) steps separately. This allows the pool foil to be replaced cheaply and quickly (it is a standard 8 x 4 x 1.50 foil). The step holder is concreted into the wall. Reku steps (60cm wide) are simply screwed onto the wall. Cost incl. wall mounting EUR 1,337. They also come in 80cm width but take up more swimming space. A Roman step would have been nice too. Unfortunately, we lacked space for that. The pool length with surroundings and rail extension for the cover is already 11.4 m. Also, making a Roman stair would be much more laborious.
The pool is built
The Achensee pool stones fit precisely, and the assembly goes relatively quickly. In principle. Because usually, the floor slab is not perfectly level. Therefore, special care must be taken for the first row of stones. I partly underpinned the stones with façade adhesive so that the first row is truly level. The main work, however, is not putting the stones together but making the reinforcement. The reinforcement protruding from the floor slab was extended vertically up to the pool height of 150cm. In addition, a double horizontal reinforcement (2x 10mm iron) was laid around for each of the 5 Styrofoam stone rows. Costs for the pool wall reinforcement amounted to EUR 539 (630m steel). The vertical rods were wired to the horizontal reinforcement. Three hours of work per row. The delivered 7m rods (630m) had to be cut and bent as well. About 4 hours of work.
At first, the stones were supposed to be filled by machine. The construction company that made the floor slab advised against this. So it was done manually. First the first three rows, then the remaining two including a 5cm concrete ring. A total of 6m3 of concrete in 2 stages. Duration more than 2 days with up to 3 people. With machine filling all 5 rows simultaneously, I find it hard to imagine the concrete flowing everywhere. The stones are staggered by half and have webs in between. There is also the horizontal reinforcement that further hinders concrete flow. We already had to assist the flow in some places in the 3 rows with rods (without compacting!!). Concrete and gravel costs EUR 1,452 (very good mix 1:3.5). This includes concrete for the pump shaft and a 40cm wide, 11.5m long, and 22cm thick foundation for the pool cover. A mixing machine was provided to me free of charge by a neighbor. Filling the lower stone rows manually is surely one of the most strenuous works in pool construction. The concrete must be poured into buckets and hoisted down. The upper rows can be filled directly from a wheelbarrow – that is faster and easier. For the lower rows, 3 people are needed: one mixes and supplies, two fill. In addition to concrete costs, there were costs for the wooden formwork for the ring and the necessary clamps (EUR 166). Overall, concreting the walls with reinforcement cost EUR 2,160. For the foundation strip left and right (each 40cm wide for the pool cover), additional costs for steel and form boards of EUR 239 occurred. Preparing this side foundation took 2 days (setting up formwork, bending and cutting steel, weaving reinforcement). The concreting itself took about 8 hours (2 people).
After setting the first row, piping to the opposite inlet nozzles was glued and laid on one long side. Since two pipes had to be laid side by side in part, the floor slab was widened at this short point with form stones as a base so the pipes rest on it. The pipes were fixed to the floor slab with holders and covered with lightweight concrete (styrofoam-cement mixture) so that they are somewhat insulated and protected from uneven pressure (stones) (costs EUR 81). I wouldn’t pour backfill (rolled gravel) directly on the pipes.
The backfilling
A dimple mat (EUR 106) was laid around the pool. Backfilled by hand with rolled gravel (13.5m3). Cost EUR 540. Work for 2 people 2 days.
The edge stones
For the surround, granite edging was ordered via eBay (cost EUR 800). For the foundations of the pool cover, matching granite slabs (40x60) were bought from the hardware store (EUR 460). EUR 75 for lawn edging stones, which form the boundary to the neighboring plot, which is somewhat higher after the foundation. Then paving stones for the pump shaft surround to separate it from the lawn (EUR 4.79). I also installed 5 LED paving stones (EUR 77) in between. Natural stone adhesive or special flexible adhesive and flexible joint compount EUR 234. Rental cost for a stone cutting machine EUR 64. It can also be done with an angle grinder. Then the cuts are not as precise and there can be chipping in the stone. And huge dust clouds.
A detail rarely mentioned is the level adjustment between the concrete ring and the hanging profiles for the pool foil before gluing the stones. The hanging profiles are mounted on the concrete ring with nail anchors. I partly underpinned them with façade adhesive because the raw concrete is not perfectly level. Level differences can also be compensated here. Mounting with nail anchors then goes relatively quickly. But now here comes the catch. There is now a level difference of about 1cm between the mounted profile and the concrete ring. This must be levelled with leveling mortar. Also on the 40cm wide strip for the pool cover foundation so that the stones are all on one level. That requires a lot of material. Costs for Cimsec leveling mortar EUR 403. Work for one person 2 days. You could partly save that if additional side foundations were concreted 1cm higher from the start. But you have to think of that first!
For cutting and gluing the stones, at least one day should be planned (first laying out, then cutting, checking, and finally gluing). The time for grouting the stones should not be underestimated either, as this must be done very cleanly and immediately cleaned (another 8 hours). Once the joint compound has dried on the rough stones, the stains are not easily removed. If only the pool edge is grouted (without additional side stones), it goes faster as some joints are omitted.
Total costs for the stone edging including support for the pool cover EUR 2,150.
The floor insulation and the plastering
For floor insulation, we did not use the insulation boards offered by pool shops because they are far too expensive. Instead, XPS tongue-and-groove boards with a compressive strength of >500 kPa. These are more pressure-resistant and cheaper. Costs EUR 375. Important: The tongue-and-groove boards (smooth) must be roughened before gluing with a wire brush because façade adhesive does not stick to the smooth surface and the boards loosen after drying. Since both edges and floor were plastered (floor also glued), additional costs for adhesive of EUR 402 occur. I definitely recommend plastering the walls because only then is a really smooth surface created. Even with PS40 stones (which are very stable and precise and hardly yield to the concrete), the transitions show. Additional costs for a 50cm stainless steel notched trowel EUR 14. For the mesh grid EUR 44. Work for gluing and doweling the floor insulation at least 1 day. That is the more intensive work because unevenness of the floor slab has to be compensated with adhesive. Additionally, I doweled (facade anchors EUR 50). Goes relatively quickly (2 hours) and provides additional security against lifting of the boards in case of leakage undermining. Plastering 2 days for one person. Floor insulation and plastering total EUR 885.
The cover
Here we chose the Dallas model with 4mm clear glass including rail extension. Cost EUR 8,990 including delivery and installation. That alone could buy a small car. It is also available as a kit completely dismantled for EUR 7,099. Then the panes have to be installed and rubber seals cut. Please note that the individual elements weigh over 150kg. Total cover thus over 600kg. Although I am handy, after watching the video about assembling the parts, it was clear the cover should be delivered finished. A middle option is to have the finished elements delivered curbside. But then the price difference to a completed cover is not very high. Also, with self-management due to the weight at least 4 people are needed. The rail extension was very important to us so that the cover can be completely pushed back and does not protrude over the pool. Therefore, the side foundations are already 2.5 meters longer than the pool’s outer sides. The company’s installation took only 3 hours.
What other costs occur?
| |
| |
For other electrical work (main switch, fuses for counter-current system and salt system, grounding wires and cables) as well as grass seed, there was an additional EUR 187. Water filling about EUR 70.